


Instructions for replacement of brake disc
General and safety information – please read carefully
Please follow all instructions carefully.
If installed by a dealer, this document should be given to the vehicle owner. The vehicle owner should keep this document for the working life of the product. In the event of a change in the ownership of the vehicle into which the product has been installed, this document should be transferred to the new owner.
This BREMBO product has been designed and manufactured to comply with all applicable safety standards. This Product is not intended to be used differently from the specific use for which it has been designed and manufactured. Use for any other purpose, or any modification to, or tampering with, the Product can affect the performance of the product and may render the product unsafe. Any modification or improper use will void the Limited Warranty and may subject the individual so using the Product to liability for bodily injury or property damage to others.
As used in these instructions,
“DANGER!” means procedures which, if not observed, have a high degree of probability that they will cause serious injury or even death.
“WARNING!” means procedures which, if not observed, could possibly cause injury.
“CAUTION!” means procedures which, if not observed, could result in damage to the vehicle
General warnings and precautions – please read carefully
DANGER! Proper installation and use of this Product is essential for the safe operation of the vehicle on which it is installed. This Product is intended to be installed only by a skilled, qualified professional who has been trained and/or is experienced in the installation and use of this Product, who has knowledge and experience with vehicle repair and maintenance and is equipped with the appropriate tools of trade. As a general rule, closely follow the instructions contained in the original literature of the vehicle manufacturer. Do not use an impact screwdriver, observe torques, always replace self-locking screws/nuts/safety elements.
Improper or incorrect installation, whether caused by a failure to follow these Instructions or otherwise, will void the Limited Warranty and could subject the installer to liability in the event of personal injury or property damage. BREMBO shall not be liable for any damage or injury caused to or by any person operating a vehicle on which a replacement product has been improperly installed.
DANGER! Always replace both the brake discs on the axle, using the two discs provided. Every time the discs are changed you should also replace the brake pads.
DANGER! Any used equipment being replaced by this Product should be properly discarded and must not be re-used or installed on any other vehicle. Property damage and serious personal injury, including death, could result.
DANGER! Ensure that the brake fluid level in the reservoir of the vehicle at all times is between the minimum and maximum levels indicated on the reservoir. An incorrect level of brake fluid can cause the brakes to malfunction and may result in personal injury, including death, and property damage. An incorrect level of brake fluid can also result in brake fluid leaks and reduce brake system efficiency.
DANGER! Always ensure the correct connection of any electrical contacts following installation. Before operating the vehicle, ensure that the vehicle’s brake warning lights come on when the brakes are used. If the vehicles’ brake lights do not come on, do not operate the vehicle.
DANGER! Do not allow the friction material of the pads, discs, calipers or brake lines to come into contact with grease, oil or other mineral oil-based lubricants or degreasing products because this could affect proper functioning of the braking system and cause physical injury or property damage. Replace these parts in the event of contamination.
WARNING! In the course of installing this Product and installing or replacing related items such as brake fluid, brake pads, brake shoes, and the like, the installer may use or be exposed to fluids and other materials that may be deemed hazardous under applicable laws and regulations, or otherwise subject to laws and regulations regulating use and disposal. All such materials must be handled, recycled and/or disposed of in accordance with all applicable laws and regulations. The failure to do so could result in bodily injury, property damage, and civil or criminal penalties.
WARNING! Handle this Product with care during the installation process. Avoid sharply striking or any other rough handling of the Product along with its parts and its components, as damage to this Product may cause it to malfunction. Replace any damaged part or component.
WARNING! To avoid personal injury or damage to property while installing this Product:
- Always use a respirator or other suitable equipment to prevent the inhalation of dust raised during cleaning of the parts and components.
- Always wear gloves during disassembly and assembly of components with sharp edges.
- Do not allow skin surfaces to make direct contact between the pad and shoe linings since this could cause abrasions.
- Avoid direct contact with brake fluid as it can cause irritation to the skin and eyes. In the event of contact, clean thoroughly in accordance with the vehicle or brake fluid manufacturer’s instructions.
- Do not subject the electrical components to electrostatic charges or to impact which could damage plastic parts.
- Protect the disassembled electrical components from moisture and humidity.
WARNING! Dispose of replaced parts in accordance with applicable laws and regulations.
WARNING! These assembly instructions are a general guide that can vary from one braking system to another. Please also follow the instructions provided by the vehicle and/or caliper manufacturer.
WARNING! Should any damage or other defect be observed on any part of the brake system during the installation process, the affected component(s) must be replaced before the vehicle is put back into service.
DANGER! Before commencing work on the braking system, attach a warning notice to the handlebar/steering wheel that the vehicle is under repair, chock the wheels not being worked on, jack up the vehicle and ensure that the vehicle is in a stable position.
CAUTION! Do not use mechanical force during disassembly.
CAUTION! The illustrations are provided only as a guide.
Replacement and installation procedure
CAUTION! Test drive the vehicle to confirm symptoms. Thoroughly inspect the connected/surrounding components. Opportunity to diagnose faults that are not brake related. Connected/ surrounding components that are not in good working condition can cause issues with NVH. Visual check can give an indication of an external issue
CAUTION! Complete the installation on one side of the axle before beginning installation on the other side of the axle. These replacement and installation steps must be identical for both brakes on the same axle. Install one brake at a time. To check if the installation is correct, you can use the brake on the other side of the axle which you have not removed yet as a visual comparison for the correct positioning of the individual parts during reassembly.
WARNING! During all the operations described, the caliper liquid inlet hose must NOT be disconnected

1. Remove the wheel

2. Remove the pads from the caliper and retract the pistons, according to fitting instructions for brake pads.
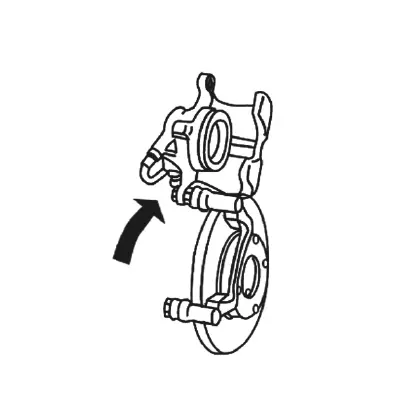
3. Remove the caliper from its mount.
CAUTION! Never apply the brake pedal or parking brake when working on the brake system, as this may cause damage to the system
DANGER! Hook the caliper to the vehicle chassis by means of appropriate support so as to prevent damage to the flexible hose.
DANGER! Avoid clamping the hose, creating bends, kinks, stretching or other contortions of the brake fluid supply tube.

4. If necessary, remove the brake carrier before removing the disc. Remove the disc

5. Clean the mounting face of the new disc
WARNING! Do not clean the braking system components with compressed air, hard brushes or similar and will not leave residue.

CAUTION! Do not contaminate the mounting face with oil or grease.
6. Clean the mounting face of the wheel hub, removing any deposits and rust; check that the surface is not damaged or deformed, and restore it to the proper condition if necessary.

7. Check for smooth rotation and correct end float of the wheel bearings.

8. If the wheel hub has not been removed: fit the new disc to the wheel hub and secure with the fixing bolt; adjust the bearing when required, following the directions of the vehicle-manufacturer.
WARNING! If appropriate, heed direction of rotation of ventilated brake discs

9. If the wheel hub was removed in step 4 (figure D): assemble the hub and disc, tightening the fixing bolts to the specified torque. Fit the assembled hub and disc to the axle, adjust the bearing and complete the operation as directed by the vehicle-manufacturer.
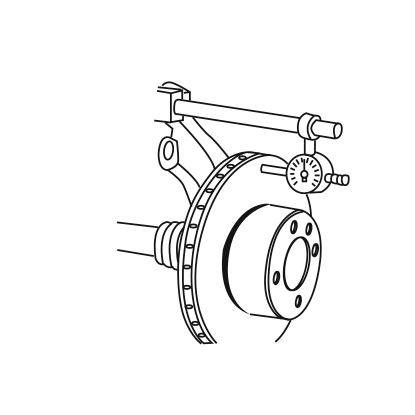
10. Check lateral runout of the disc using the metrological kit; the dial gauge must be positioned as illustrated, 5mm from the outer diameter. Secure the disc with a number of wheel nuts to simulate the condition in which the wheel is mounted. The maximum value of runout per full revolution of the disc is: 0.10 mm for cars - 0.12 mm for commercial vehicles. If necessary, remove the disc and refit to the wheel hub in a different position, then repeat the measurement.

CAUTION! Conduct this test with care. A runout value higher than indicated will lead to abnormal wear and generate vibration when braking.
11. If the runout measurement is unacceptable, measure the runout of the wheel hub mounting face; if necessary, replace the hub and refit the disc.
CAUTION! The permissible runout value for the wheel hub mounting face is approximately half that specified for the disc.

12. Refit the caliper to its mount; in the case of a floating caliper, check for smooth sliding action of the pins and guides bushes.
WARNING! Check that rubber parts are not damaged. Replace if necessary.

13. Fit the new pads, with the relative springs and pins. Grease the back and edges of the pads where indicated. If the pad has a rubber noise preventing shim on the back plate, there is no requirement for grease at the back of the pads. Connect the wear indicator, if installed.

14. Depress the brake pedal to compress the disc against the brake pads. Repeat this operation until the pedal moves properly.
15. Check the level of brake fluid in the reservoir, topping up if necessary.
16. Refit the wheel and tighten the wheel nuts as indicated by the vehicle maker or as in the Brembo catalogue.
17. Balance the wheel.
Testing and bedding in
DANGER! During initial use of the new discs and pads, remember that braking performance is reduced and therefore it is necessary to:
- moderate your speed.
- avoid sudden braking.
- always observe all applicable traffic laws and regulations.
Road test the vehicle, taking care not to stab at the brakes or keep the pedal depressed for more than 3 seconds; make certain there is no noise or vibration from the brakes.
DANGER! Always follow the bedding-in instructions provided by the vehicle manufacturer. In the absence of instructions from the vehicle manufacturer, it is recommended to use the vehicle for a period of at least 200km/125 miles applying the brakes gently and sparingly during that period, avoiding sudden braking for more than 3 seconds and without activating the vehicle’s Antilock Braking System.
Carry out a functional test on a rolling road to ascertain that the system meets all legal requirements.
WARNING! If new brakes are not properly broken in, the braking system may not operate properly.
Warranty limitations
This warranty covers all the conformity defects occurring within two years from delivery of the good. The consumer is required to report to the seller the conformity defect within two months from the date of discovery of the said defect, without prejudice to the fact that the limitations period for taking action aimed at seeking redress for the defect is twenty-six months from delivery of the good. In the event of a conformity defect, the user has the right to repair or replacement of the good, or to an appropriate price reduction or termination of the contract, as established by art. 130 of the Consumer Code, where applicable.This warranty constitutes the only warranty provided in relation to this product and replaces any other warranties, both verbal and written.
Is there anything else you want to ask?
Contact the Brembo technical support team. Our technicians will get back to you as soon as possible!