
Instructions for the replacement of the brake caliper
Conventions
The illustrations are provided as a guide. Before starting, make sure the replacement parts are suitable for the make and model of vehicle.
WARNING!
After replacing the caliper, make sure the supply brake lines on the vehicle are not twisted or excessively bent, as this would obstruct the passage of fluid. If necessary, replace the brake lines with more suitable ones.
WARNING!
During all the phases described below, ensure that the brake fluid does not come into contact with the vehicle painted parts. In the event of splashes or leaks of the fluid, immediately stop the leak with paper.
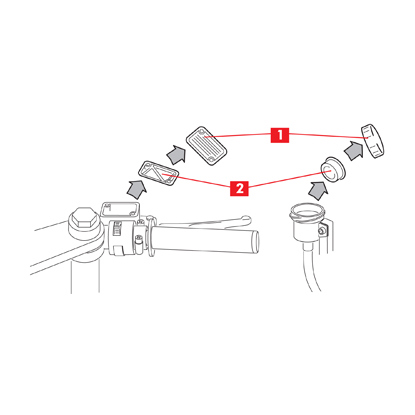
1. Place the motor bike on the stand.
2. Open the plug (point 1) and remove the diaphragm (point 2) son the brake fluid thank that supplies the caliper to be removed.
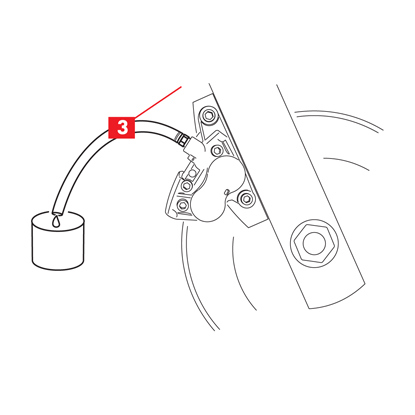
3. Connect a transparent pipe to the bleed plug (point 3) of the caliper and place a container at the other end to collect the fluid.
4. Unscrew the bleed plug (point 3) and empty the hydraulic circuit.
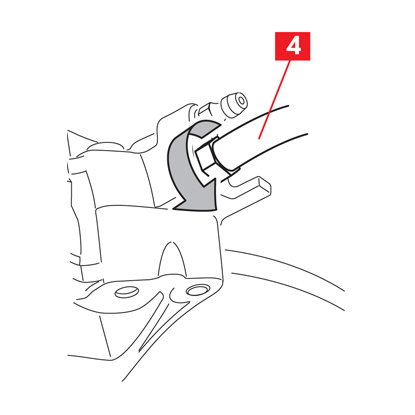
5. Close the bleed plug and remove the collecting pipe.
6. Loosen the fluid supply pipe (point 4) on the caliper so that it can be unscrewed by hand later.
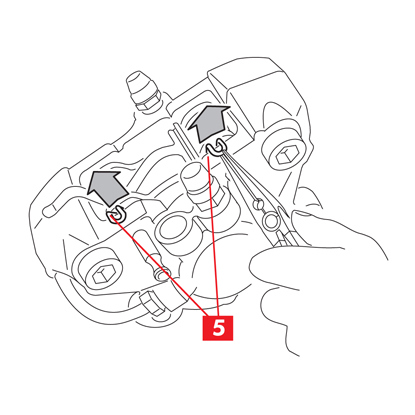
7. Remove the split pins (point 5) using a pair of pliers.
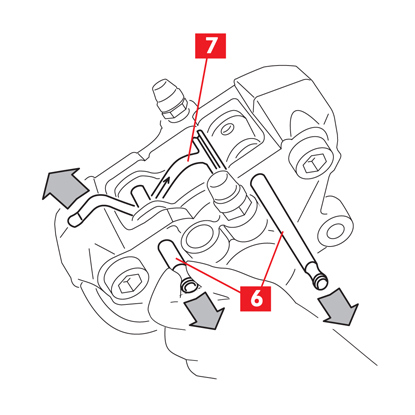
8. Remove the pins (point 6) using a hammer and pin driver if necessary.
9. Remove the spring (point 7).
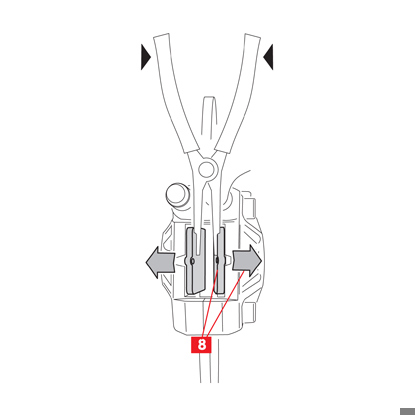
10. Separate the brake pad (point 8) gently, using a retractor or other suitable tool.
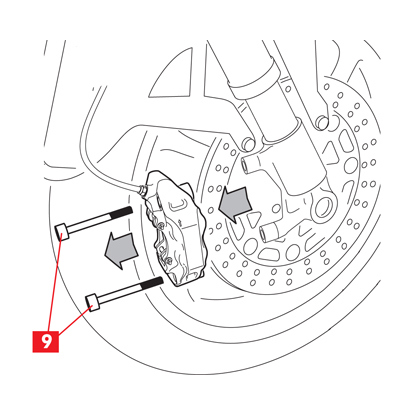
11. Unscrew the fixing bolts (point 9) using an open-end spanner, and remove the caliper from the motorcycle frame.
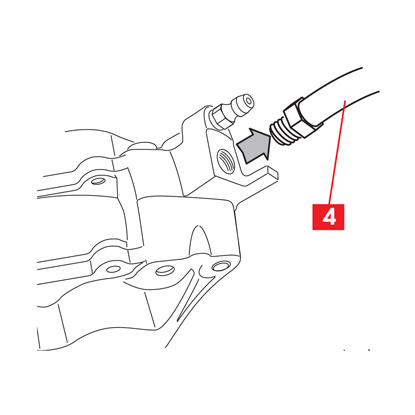
12. Complete detachment of the fluid supply pipe (point 4) from the caliper.
13. Keep the end of the supply pipe raised to prevent fluid leaks.
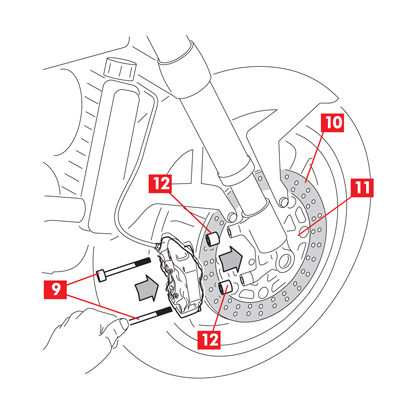
14. Clean the braking surface (point 10) of the disc (point 11) with a degreaser, e.g. SE 47 solvent.
15. Position the new caliper on the motorcycle.
16. Replace the original screw (point 9) with ones from the kit provided.
17. If necessary, mount the spacers (point 12) provided in the kit.
18. Insert the screws (point 9) without tightening
16. Replace the original screw (point 9) with ones from the kit provided.
17. If necessary, mount the spacers (point 12) provided in the kit.
18. Insert the screws (point 9) without tightening
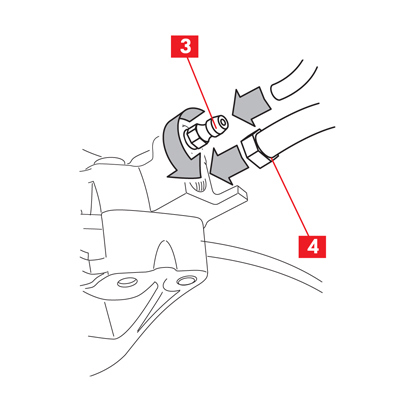
19. Reconnect the brake fluid supply pipe (point 4) and tighten the union with a fixed spanner to an indicative torque of 17-20 Nm.
20. Fill the brake fluid tank with fresh fluid in compliance with the manufacturers specifications.
21. Connect a transparent pipe to the bleed plug (point 3) of the caliper and place a container at the other to collect the fluid.
22. Open the bleed plug (point 3).
23. Operate the brake lever.
24. Reclose the bleed plug.
DANGER! Do not release the lever with the bleed plug open, as this causes air to be sucked into the hydraulic circuit.

25. Release the brake lever.
26. Unscrew the bleed plug.
27. Operate the brake lever.
28. Repeat the four previous points until comes out without any air bubbles and the usual brake lever resistance is restored.
29. Close the bleed plug and remove the transparent pipe.
30. Tighten the bleed plug to a torque of 12÷16 Nm.
31. With the system pressurized, tighten all the caliper fixing bolts (point 9), applying the tightening torque prescribed by the vehicle manufacturer. (indicative value: 46Nm).
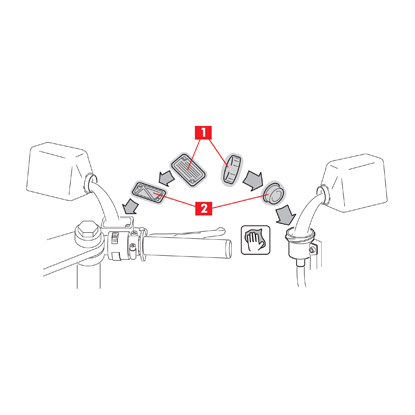
32. After bleeding, the brake fluid in the tank is at the minimum level. Fully retract the pistons, pressing the pads with your hands and then top up.
33. Thoroughly clean the diaphragm (point 2) of the brake fluid tank and remove all remains of fluid.
34. Reposition the diaphragm and the plug (point 1) on the brake fluid tank and tighten all possible screws).
DANGER! If you notice any leaks from the caliper, repeat the whole procedure above in order to determine the cause and correct the defect.
35. Take the bike off the stand.
General and safety information
This product has been designed to comply with all applicable safety standards. Products are not intended to be used differently from the specific use for which they have been designed and manufactured. Use for any other purpose, or any modification to, or tampering with, the Product can affect the performance of the Product and may render the Product unsafe. Such modification or improper use will void the Limited Warranty, and may subject the individual so using the Product to liability for bodily injury or property damage to others.
As used in these instructions, “DANGER!” means procedures which, if not observed, have a high degree of probability that they will cause serious injury or even death. “WARNING!” means procedures which, if not observed, could possibly cause injury. “CAUTION!” means procedures which, if not observed, could result in damage to the vehicle.
DANGER!
- This Product is vital to the safe operation of the vehicle on which it is installed, and it is intended to be installed only by a skilled, qualified individual who has been trained and/or is experienced in the installation and use for which the Product is intended.
- The installer must be equipped with the proper tools of his trade, and with the knowledge and experience to deal with vehicle repairs. Improper or incorrect installation, whether caused by a failure to faithfully and completely follow these Instructions or otherwise, will void the Limited Warranty and could subject the installer to liability in the event of personal injury or property damage.
- Brembo shall not be liable for any damage or injury caused to or by any person operating a vehicle on which a replacement product has been improperly installed.
- Avoid contact of grease and other lubricants with the braking surfaces of the disc and pads as this could affect the efficiency of the braking system and cause serious physical damage.
- The used product replaced by this Product must not be installed on any other product. Property damage and personal injury, including death, could result.
- Always check that the brake fluid level in the reservoir is between the minimum and maximum levels indicated on the reservoir. An incorrect level can cause brake fluid leaks or reduced brake system efficiency. Too much or too little brake fluid in the reservoir could cause the brakes not to perform properly, and personal injury, including death, could result.
CAUTION!
Do not use sharp tools when fitting rubber components, since this can damage them. Be sure to replace damaged components.
WARNING!
- To avoid creating a defective installation, avoid sharply striking and /or damaging the Product, its parts and its components, as this can impair their efficiency and may cause them to malfunction. If necessary, replace any damaged part or component.
- In the course of replacing the product, and related items such as brake fluid, brake pads, brake shoes, and the like, the installer will be exposed to fluids and parts that may be deemed to be “hazardous waste” under applicable laws, rules and regulations. All such wastes must be handles, recycled and(or disposed of in accordance with all applicable laws, rules and regulations. The failure to do so can subject the generator of the hazardous waste to penalties under environmental laws, and could result in bodily injury or property damage to the generator or others.
- To avoid injury:
- Use suitable equipment to prevent the inhalation of dust raised during cleaning of the parts.
- Always wear gloves during disassembly and assembly of components with sharp edges.
- Do not allow skin surfaces to make direct contact between the pad and shoe linings since this could cause abrasions.
- Do not place your hands in the pad locating seat when removing the caliper pistons with aid of compressed air, due to the risk of crushing.
- Avoid direct contact with the brake fluid as it can cause irritation to the skin and eyes. In the event of contact, clean thoroughly in accordance with the vehicle or brake fluid manufacturer’s instructions.
- Do not subject the electrical components to electrostatic charges or to impact which could damage the plastic parts.
- Protect the disassembled electrical components from humidity.
- Ensure correct connection of any electrical contacts, checking that the warning lights come on. If they do not, non-operation of the warning lights can cause a reduction in efficiency of the braking system, or brake signaling failure.
Ábyrgðartakmarkanir
Þessi ábyrgð nær yfir allra samræmisgalla sem koma fram innan tveggja ára frá því að varan er afhent. Neytanda er skylt að tilkynna söluaðila um samræmisgalla innan tveggja mánaða frá því að umræddur galli kom í ljós, með fyrirvara um að fyrningarfrestur til að grípa til aðgerða til að bæta úr gallanum er tuttugu og sex mánuðir frá því að varan er afhent. Ef um samræmisgalla er að ræða á notandi rétt á viðgerð eða endurnýjun vörunnar, eða á viðeigandi verðlækkun eða uppsögn samnings, eins og kveðið er á um í gr. 130 í neytendalögum, eftir því sem við á.Þessi ábyrgð er eina ábyrgðin sem veitt er í tengslum við þessa vöru og kemur í stað hvers kyns annarra ábyrgða, hvort sem þær eru munnlegar eða skriflegar.
Er eitthvað annað sem þú vildir spyrja um?
Hafa samband við tækniaðstoð Brembo. Tæknimenn okkar munu hafa samband við þig eins fljótt og auðið er!
Hvernig getum við aðstoðað þig?


