Instructions for replacing the caliper bracket on cars and light commercial vehicles
Please read and follow all instructions carefully. You’ll find the same instructions in the caliper bracket pack. Remember to keep them for the entire product life cycle. Hand them over to the new owner if you sell your vehicle.
These fitting instructions are a guideline for standard repair work and do not take into consideration any special features which might apply to the different brake systems. The special instructions issued by vehicle and brake system manufacturers must be followed in detail.
This document provides instructions for the replacement of the caliper bracket for floating calipers with 2 or 4 side springs and residual torque reducing springs.
When replacing only the side springs, only refer to the relevant parts.
Replacement procedure
Before commencing replacement, ascertain that the spare parts used for replacement are suitable for the make and model of the vehicle.
Make a note of the position of all the partially or fully disassembled components for correct reassembly.
CAUTION! During all the caliper bracket replacement operations, the flexible fluid inlet hose in the caliper must NOT be disconnected.
Here is the procedure for replacing ECS calipers:
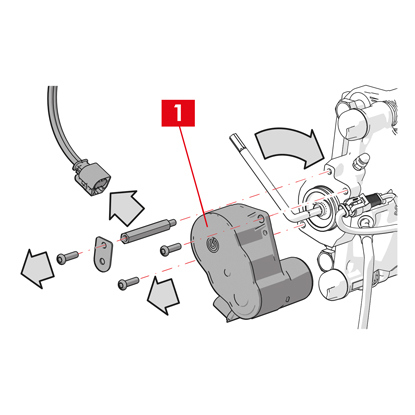
1. WARNING! In the event of an electrical failure, disassemble the actuator unit (as specified in point 1) and pull the piston back, turning the torx screw clockwise with a suitable spanner.
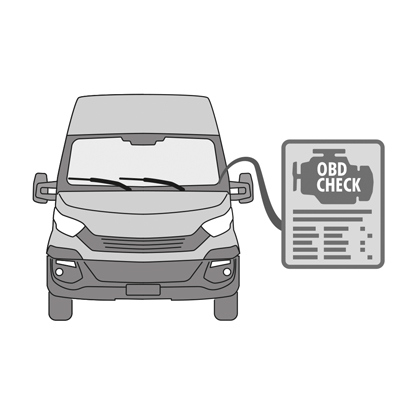
2. Connect the diagnostics tool (On Board Diagnosis - OBD) to the vehicle and put it in maintenance mode procedure as described by the vehicle manufacturer.
CAUTION! Without this operation, the piston cannot be pulled back with the retractor or another suitable tool.
Make sure the spare part is compatible with the vehicle software.
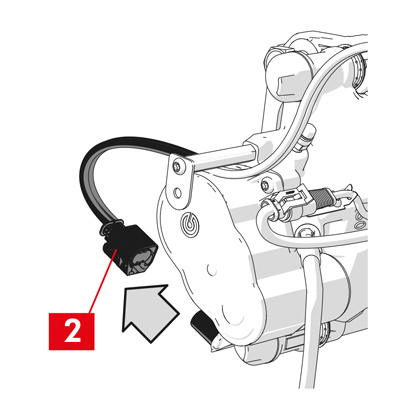
3. Disconnect the electricity supply cable (point 2) from the actuator unit.
WARNING! The connector may be fitted with a safety latch.
Replacement procedure for all types of calipers:
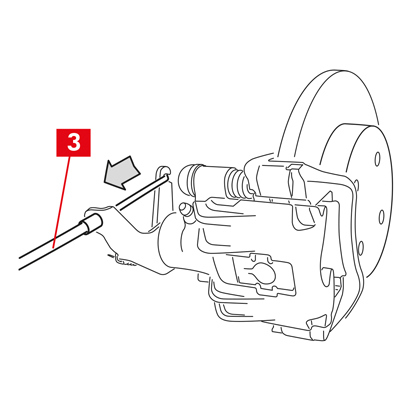
4. For calipers with a parking brake, detach the control cable (point 3) from the caliper.
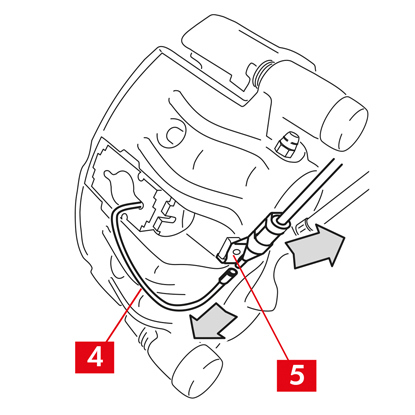
5. Disconnect the wear indicator (point 4), where present, from the terminal in the vehicle, releasing it from the shim (point 5) that secures it to the caliper and from any attachments on the chassis.
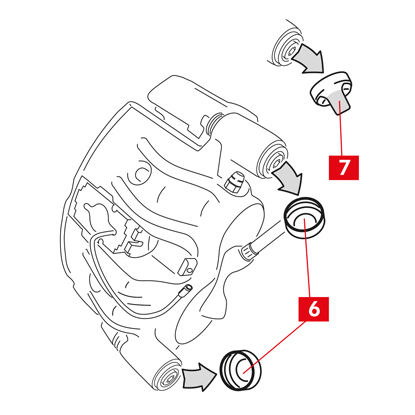
6. Remove the protective caps (point 6) from the guiding bushes.
7. If the cap has a lip (point 7), snap off the cap by pulling on the lip with your fingers.
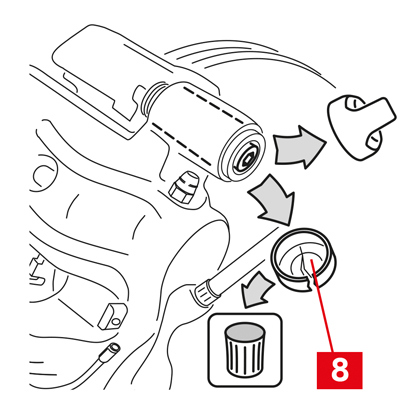
8. If the cap is made of hard plastic (point 8), prise if off with a screwdriver. Removing the cap will break it.
WARNING! Do not reuse the disassembled hard plastic cap.
CAUTION! The guiding bush to disassemble must be the one that allows the caliper body to turn without causing the brake fluid supply line to stretch.
WARNING! There are two types of guiding bushes:
WARNING! Do not reuse the disassembled hard plastic cap.
CAUTION! The guiding bush to disassemble must be the one that allows the caliper body to turn without causing the brake fluid supply line to stretch.
WARNING! There are two types of guiding bushes:
- with separate screw
- with incorporated screw
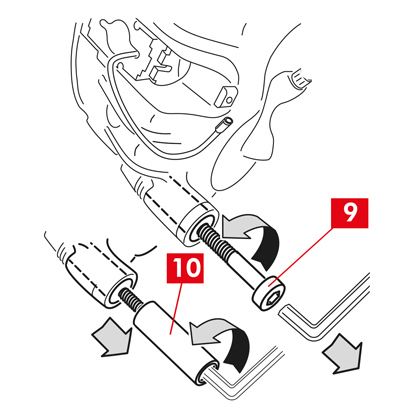
9. Loosen and completely remove the screw (point 9) or incorporated guiding bush (point 10) using a spanner.
10. In the case of a non-incorporated guiding bush (point 11), pull the guiding bush out of the caliper bracket (point 12) prising it out of its seat with a screwdriver.
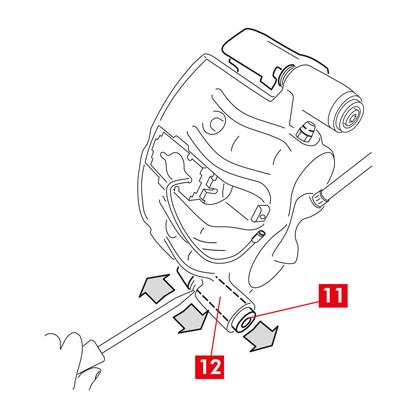
11. When replacing the caliper on rear wheels with suspension and leaf springs, both the guiding bushes 11 must be removed to separate the caliper body (point 13) completely from the caliper bracket (point 12).
WARNING! If there are any brake pads glued to the caliper, detach them using a screwdriver and take care not to damage any rubber parts of the caliper.
DANGER! Opening the caliper body may cause the residual torque reducing springs to spring open.
DANGER! Opening the caliper body may cause the residual torque reducing springs to spring open.
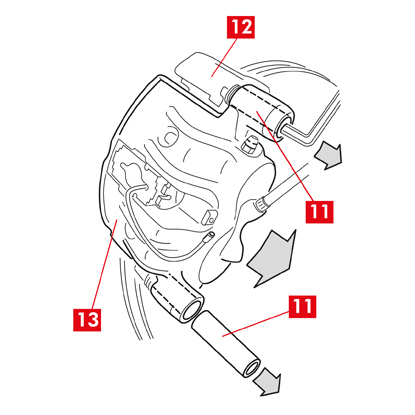
12. Pull the caliper body (point 13) away from the caliper bracket (point 12) by twisting it around the other guiding bush until the pads come out of the caliper bracket. Attach the caliper body to the vehicle chassis using appropriate supports. Do not use the bush seat as a point of attachment.
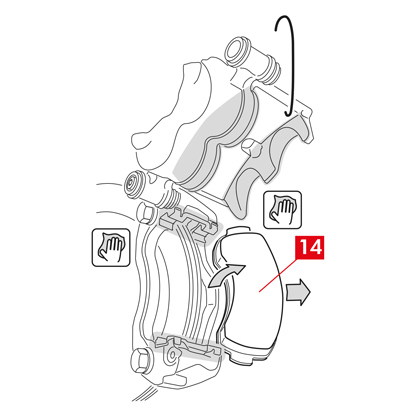
13. Remove the pads (point 14) without causing any damage.
14. Use a marker to mark the direction of rotation of the disc on the pads to avoid reassembling them incorrectly.
15. Clean the mounting face of the pads using suitable materials and products (e.g. a damp cloth). Remove any glue residue from the mounting face of the pads on the caliper body.

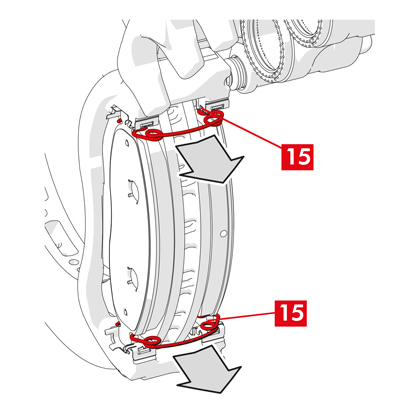
16. If they are still in position, remove the residual torque reducing springs (point 15).
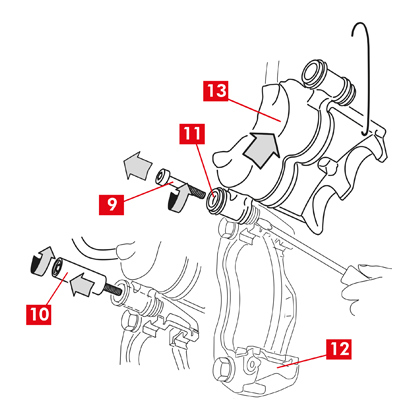
17. Loosen completely and remove the screw (point 9) or incorporated guiding bush (point 10).
18. In the case of a non-incorporated guiding bush (point 11), pull the guiding bush out of the caliper bracket (point 12) prising it out of its seat with a screwdriver.
19. Pull the caliper body (point 13) away from the caliper bracket (point 12) taking care not to cause the brake fluid supply line to stretch.

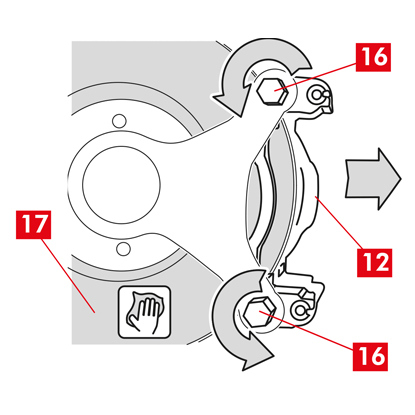
20. Unscrew the fixing bolts (point 16) using an open-ended spanner and remove the caliper bracket (point 12) from the hub bracket.
21. Clean the braking surfaces (point 17) on the disc using a degreasing product (e.g. Solvent SE47).
CAUTION! For calipers with a parking brake: while the caliper body is disassembled from the brake disc and/or the brake pads are absent, do not move the piston either hydraulically or using the lever as this could damage the spring and/or cause the brake fluid to leak.
Fitting procedure
Clean the mounting faces on the hub bracket.
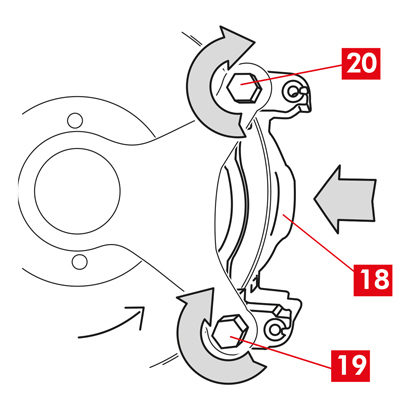
1. Position the new caliper bracket (point 18) by inserting it in the disc.
2. Insert and approach the two fixing bolts (points 19 and 20).
3. Tighten the fixing bolt on the disc entry side (point 19) (in forward gear) applying the tightening torque recommended by the vehicle manufacturer.
4. Tighten the second fixing bolt 20 (on the disc exit side) applying the tightening torque recommended by the vehicle manufacturer.
Use the following recommended tightening torques for reference:
| Type of screw | M12x1,25 | M12x1,5 | M14x1,5 | M16x1,5 |
| Tightening torque | 115 Nm | 125 Nm | 180 Nm | 210 Nm |
Fitting the pads
CAUTION! If there are any pads with an adhesive side, then new pads must be fitted; follow the instructions provided with the spare pads.
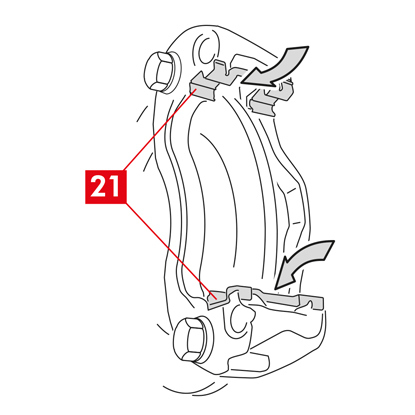
1. Where spares are present, replace the side springs (point 21) in the caliper bracket, exerting the right amount of pressure to attach them securely.
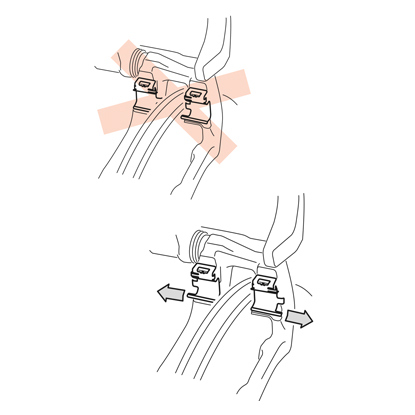
2. In the case of calipers with four springs, always fit the springs with the vanes facing the outside of the caliper bracket.
CAUTION! Observe the correct fitting direction.
CAUTION! Observe the correct fitting direction.
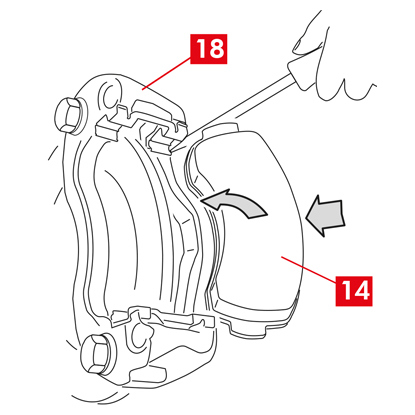
3. Insert the pads (point 14) in the caliper bracket (point 18). Use a screwdriver to press the side springs.
WARNING! Any arrows stamped on the pads must be pointing in the disc rotation direction.
DANGER! Pads must be inserted with the friction material facing the disc.
CAUTION! The pad with a wear indicator must be fitted back into the position it was originally in before being disassembled.
WARNING! Any arrows stamped on the pads must be pointing in the disc rotation direction.
DANGER! Pads must be inserted with the friction material facing the disc.
CAUTION! The pad with a wear indicator must be fitted back into the position it was originally in before being disassembled.
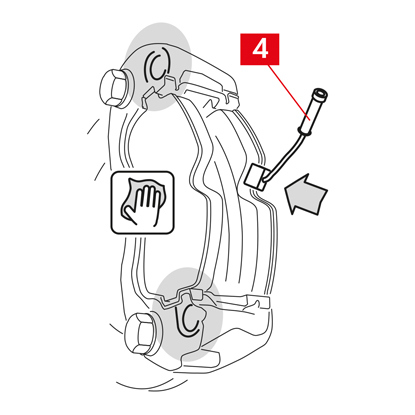
4. Where present, attach the wear indicator terminal (point 4) to the pad opposite the pistons, replacing it if necessary.
CAUTION! When attaching the wear indicator terminal, make sure the most protruding part is facing the friction surface on the pad.
CAUTION! When attaching the wear indicator terminal, make sure the most protruding part is facing the friction surface on the pad.
Fitting the caliper body
WARNING! If there are any new pads, the pistons must be pulled back; follow the instructions provided with the spare pads.
1. Use a damp cloth to clean the caliper bracket fitting areas on the caliper body (ends of guides, covers).
CAUTION! Do not use products which could damage the protective covers, such as nitro-tetrachloroethylene thinner, petrol, etc.
CAUTION! Do not use products which could damage the protective covers, such as nitro-tetrachloroethylene thinner, petrol, etc.
2. Clean and uniformly grease the entire internal surface of the covers, the external surface of the guiding bushes and their seats in the caliper body.
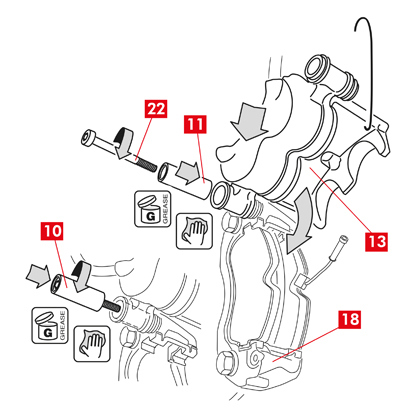
3. Position the caliper body (point 13), setting one of the two guiding bushes (point 10) in the seat on the caliper bracket (point 18).
4. In the case of a non-incorporated guiding bush (point 11), fit and tighten a new screw (point 22).
CAUTION! The guiding bush to position must be the one that allows the brake fluid supply line to remain free from any stretching.
5. Close the caliper carefully, by twisting the caliper body (point 13) around the seated guiding bush.
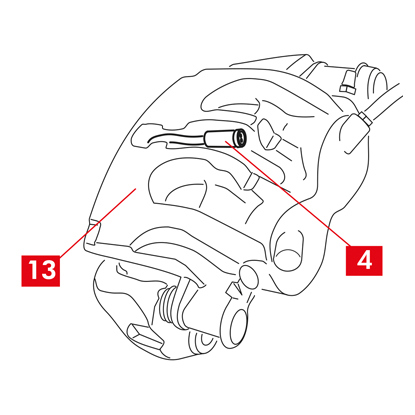
6. Thread the wear indicator probe (point 4) through the dedicated hole in the caliper body (point 13).
CAUTION! Close the caliper carefully, making sure the protective covers on the bushes are not damaged by knocking against the caliper support. Replace the covers if necessary.
WARNING! If there are any pads with an adhesive side, take care not to create contacts between the body and the pad before you have completed the caliper body fitting.
WARNING! If there are any pads with an adhesive side, take care not to create contacts between the body and the pad before you have completed the caliper body fitting.
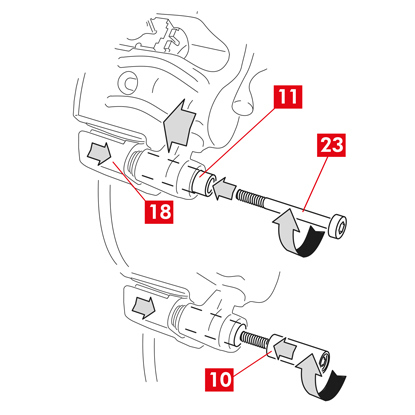
7. Reinsert the other guiding bush (point 10) in the caliper bracket seat (point 18).
8. In the case of a non-incorporated guiding bush (point 11), fit and tighten a new screw (point 23).
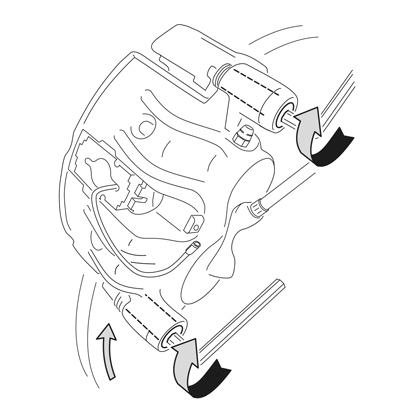
9. Tighten the guiding bush fastening screw or the incorporated guiding bush on the disc entry side (in forward gear). Next, tighten the other screw or the incorporated guiding bush at the same torque.
CAUTION! When replacing the caliper bracket on rear wheels with suspension and leaf springs, the caliper body must be repositioned on the caliper bracket, then reinsert both guiding bushes and insert and tighten two new screws.
10. Tighten at the tightening torque specified in the following table:
| Type | Tightening torque | |
| Fastening screw | (M8 - CH6) | 32÷36 Nm |
| Guiding bush with incorporated screw | (M8 - CH6) | 32÷36 Nm |
| Guiding bush with incorporated screw | (M10 - CH8) | 65÷75 Nm |
DANGER! Observe the tightening sequence described; failing to could compromise the proper functioning of the caliper.
For calipers with a parking brake
1. Use the lever to assemble the piston with the pads.
CAUTION! Before assembling the piston with the pads, make sure the caliper bracket, pads and disc are present.
CAUTION! Hydraulic operation is only permitted when the piston is less than 1 mm from the pads.
For all types of calipers
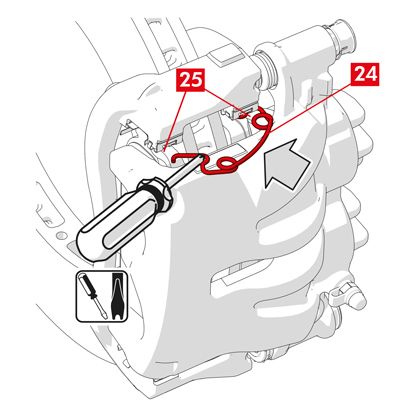
1. In the case of residual torque reducing springs (point 24) hook the spring under the plate (point 25) of the pad and hook the underside of the plate on the other pad with the aid of a hollow tip screwdriver.
DANGER! Incorrect attachment of the spring could cause it to spring open.
CAUTION! Observe the correct fitting direction.
DANGER! Incorrect attachment of the spring could cause it to spring open.
CAUTION! Observe the correct fitting direction.
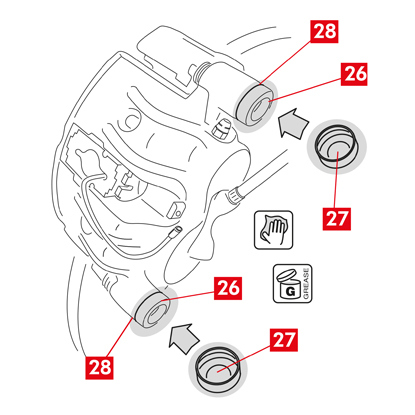
2. Carefully clean the part (point 26) to make sure it stays in place and fit new protective caps (point 27), greasing their internal surface and the caliper body seat with grease provided in the spare part kit.
WARNING! EUH210 - Safety data sheet available upon request.
WARNING! EUH208 - Contains N-alkylated benzotriazole. May cause an allergic reaction.
3. Turn the protective caps (point 27) so that they adhere fully to the seat (point 28).
For calipers with a parking brake
1. Reconnect the wear indicator, where present, to the terminal in the vehicle, securing it with a light pressure to the shim present on the caliper and securing any attachments on the chassis.
2. Restore the correct tension to the control cable.
3. Repeatedly operate the parking brake lever in the vehicle cab until the usual stroke has been re-established.
2. Restore the correct tension to the control cable.
3. Repeatedly operate the parking brake lever in the vehicle cab until the usual stroke has been re-established.
For ECS calipers
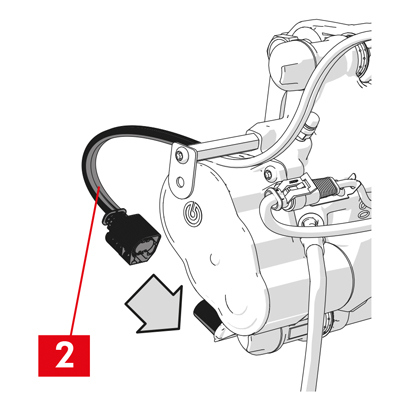
1. Remove the protective cap (where present) and connect the electrical supply cable (point 2).
2. Perform the reset procedure (Assembly check).
3. If necessary, reset the counters (Reset Internal Counters) as prescribed by the vehicle manufacturer.

4. If required by the vehicle manufacturer, run in the pads.
5. Disconnect the diagnostics device (On Board Diagnosis - OBD).
For all types of calipers
1. Refit the wheel.
2. Operate the brake pedal until optimal pressure is re-established in the system and the force and normal stroke of the pedal are restored.
2. Operate the brake pedal until optimal pressure is re-established in the system and the force and normal stroke of the pedal are restored.
3. Check the level of brake fluid in the reservoir and top up if necessary.
4. Close the brake fluid reservoir cap.
5. If the pads are new, run them in; follow the instructions provided with the spare pads.
Warranty limitations
This warranty covers all the conformity defects occurring within two years from delivery of the good. The consumer is required to report to the seller the conformity defect within two months from the date of discovery of the said defect, without prejudice to the fact that the limitations period for taking action aimed at seeking redress for the defect is twenty-six months from delivery of the good. In the event of a conformity defect, the user has the right to repair or replacement of the good, or to an appropriate price reduction or termination of the contract, as established by art. 130 of the Consumer Code, where applicable.
This warranty constitutes the only warranty provided in relation to this product and replaces any other warranties, both verbal and written.
In the event of the occurrence of defects, the user is required:
- Under penalty of invalidation, to notify the manufacturer and distributor in writing within sixty days; at the same time, the user shall provide a description of the defect found on the Product or on the parts returned, and a proof of purchase of the original user which identifies both the Product and the date of purchase (whether purchased retail or sold by a distributor as part of the Product installation);
- To send the Product assumed to be defective to Brembo S.p.A. to the headquarters in via Brembo 25 -24035 Curno (BG) - Italy, via the distribution chain.
The warranty does not operate for:
- Damage to the Product caused, partly or entirely, by incorrect use, accident, fire, chemical corrosion, use for purposes other than those scheduled, illicit use, use on a model different from the one scheduled, incorrect installation, installation contrary to the directions of the Manufacturer, or lack of maintenance on the Product as prescribed by the Manufacturer in the instructions provided;
- Complaints connected with comfort, the presence of noise, vibrations or harsh riding characteristics.
The Product has been designed and produced for the specific model and use indicated in the Brembo catalogues and/or by the Brembo product distributors, both available on the Brembo website (www.brembo.com). The Product shall be used according to the laws in force in the states and/or in the countries where the vehicle on which the Product is installed is used, including, but without limitation to, observance of the regulations of the Highway Code and after obtaining any authorisation/approval, permit or licence required by the state and/or country.
For products sold in the territories of the European Union member states, these Warranty Limitations operate in compliance with the provisions of the Directive 85/374/EEC of the Council of 25th July 1985.
For products sold in the territories of the United States, these Warranty Limitations operate in compliance with any applicable federal or state law.
General and safety information
This Brembo product has been designed to comply with all applicable safety standards. Products are not intended to be used differently from the specific use for which they have been designed and manufactured. Use for any other purpose, or any modification to or tampering with the Product can affect the performance of the Product and may render the Product unsafe.
Such modification or improper use will void the Limited Warranty, and may subject the individual so using the Product to liability for bodily injury or property damage to others.
In these instructions, the “DANGER!” warning means procedures which, if not observed, have a high degree of probability that they will cause serious injury or even death. “CAUTION”” means procedures which, if not observed, could result in physical damage whereas “WARNING!” means procedures which, if not observed, could possibly cause damage to the vehicle.
DANGER!
Before commencing replacement, ascertain that the spare parts are suitable for the make and model of the vehicle. This Product is vital to the safe operation of the vehicle on which it is installed, and it is intended to be installed only by a skilled, qualified individual who has been trained and/or is experienced in the installation and use for which the Product is intended.
The installer must be equipped with the proper tools of his trade, and with the knowledge and experience to deal with vehicle repairs. Improper or incorrect installation, whether caused by a failure to follow these Instructions faithfully and completely or otherwise, will void the Limited Warranty and could subject the installer to liability in the event of personal injury or property damage.
Brembo shall not be liable for any damage or injury caused to or by any person operating a vehicle on which a replacement product has been improperly installed.
CAUTION!
Replaced parts must be disposed of in accordance with the law.
It is vital to avoid sharply striking and/or damaging the Product, its parts and its components, as this can impair their efficiency and may cause them to malfunction. If necessary, replace any damaged part or component. To avoid injury we recommend the following:
- Use suitable equipment to prevent the inhalation of dust raised during cleaning of the parts.
- Always wear gloves during disassembly and assembly of components with sharp edges.
- Do not allow skin surface to make direct contact with the friction material of pads and brake shoes since this could cause abrasions.
- Do not introduce your hands in the seat of the pads when removing the caliper pistons using compressed air as this involves the risk of crushing your hands.
- Avoid direct contact with the brake fluid as it can cause irritation to the skin and eyes. In the event of accidental contact, clean thoroughly in accordance with the vehicle or brake fluid manufacturer’s instructions.
- Do not subject the electrical components to electrostatic charges or to impact which could damage the plastic parts.
- Protect the disassembled electrical components from humidity.
- Ensure correct connection of any electrical contacts , checking that the warning lights come on. If they do not, non-operation of the warning lights can cause a reduction in efficiency of the braking system, or brake signalling failure.
- Avoid contact of grease and other lubricants with the braking surfaces of the brake disc, drum, pads and shoes as this could affect the efficiency of the braking system and cause serious physical damage.
Ábyrgðartakmarkanir
Þessi ábyrgð nær yfir allra samræmisgalla sem koma fram innan tveggja ára frá því að varan er afhent. Neytanda er skylt að tilkynna söluaðila um samræmisgalla innan tveggja mánaða frá því að umræddur galli kom í ljós, með fyrirvara um að fyrningarfrestur til að grípa til aðgerða til að bæta úr gallanum er tuttugu og sex mánuðir frá því að varan er afhent. Ef um samræmisgalla er að ræða á notandi rétt á viðgerð eða endurnýjun vörunnar, eða á viðeigandi verðlækkun eða uppsögn samnings, eins og kveðið er á um í gr. 130 í neytendalögum, eftir því sem við á.Þessi ábyrgð er eina ábyrgðin sem veitt er í tengslum við þessa vöru og kemur í stað hvers kyns annarra ábyrgða, hvort sem þær eru munnlegar eða skriflegar.
Er eitthvað annað sem þú vildir spyrja um?
Hafa samband við tækniaðstoð Brembo. Tæknimenn okkar munu hafa samband við þig eins fljótt og auðið er!


